Timesheets
The Timesheets FAQ section contains guidance and answers to frequently asked questions about LightWork’s timesheet functionality and related processes.
-
I received an update with the new Time Zone Handling modifications but the time on my Timesheets still looks the same. Why is that?
The LightWork Team recommends applying the update with the new Time Zone Handling at the beginning of a Pay Period to minimize confusion. The updated handling for Time Zone display does not modify historical or legacy entries on a Timesheet. This means that if the update is applied in the middle of the Pay Period, the entries on the Timesheet from before the update took place would continue to display with the previous 'localization'. Entries that are added to a Timesheet after the update will have the updated Time Zone handling in place. So, any new entries will reflect the new display rules.
If you have any questions or need clarification regarding how your Timesheets are displayed post-update, please don't hesitate to reach out to our Support Team, if you're a named support user for your orgnaization.
-
If an Employee has not approved their time, the status will show as Open, but once they do approve it, it will show as EE submit. Correct?
Yes, that is correct. Though, remember that a Manager can approve a Timesheet even if an Employee hasn't done so yet. This would change the status to MGR Approved (or whatever your Manager Approval Status is named based on your LW setup). This logic is the same for any upper Manager or HR User. The reason LightWork works this way is to ensure that a Timesheet can go through payroll even if an Employee forgets to approve their time.
-
What is Geotagging?
Geotagging in LightWork is the process of adding geographical identification metadata to punches captured within the system from Personal and Public Kiosks. This data usually consists of latitude and longitude coordinates, though depending on the device used this can also include altitude, accuracy data, and time stamps.
In regards to GPS information for punches, once turned on, this functionality wouldn’t be available for punches ‘going back’ or before the Timesheet Module Options are modified to turn on Geotagging. To enable this functionality you’d navigate into the Timesheet Module Options and enable the ‘Geo Tagging’ option.
Once this is enabled, punches coming from GPS-capable devices where Location permissions have been granted to LightWork will have accompanying LAT/LONG coordinates in the Line Item drop-down within a Timesheet. If no coordinates are visible, there is a record of denied location access permissions that can be accessed when reviewing back-end data. Some other reasons why this could be occurring:
-
User denies access when prompted for Allowing LightWork to know your location as they Punch.
-
The permission was previously denied at one point and the browser is retaining that ‘deny’ and isn’t re-asking each time (browser-stored Location Permission setting).
-
The User is punching using incognito mode in their browser.
-
The User is on a device that doesn’t support LAT/LONG coordinates.
If you are interested in utilizing LightWork physical Timeclocks and would like to utilize GPS coordinates or if your team has any additional questions regarding this functionality, and you're a named support user for your organization, you can reach our Support Team to open a support ticket.
-
-
Why am I not seeing a Holiday populate on Timesheets after running Holiday Pay?
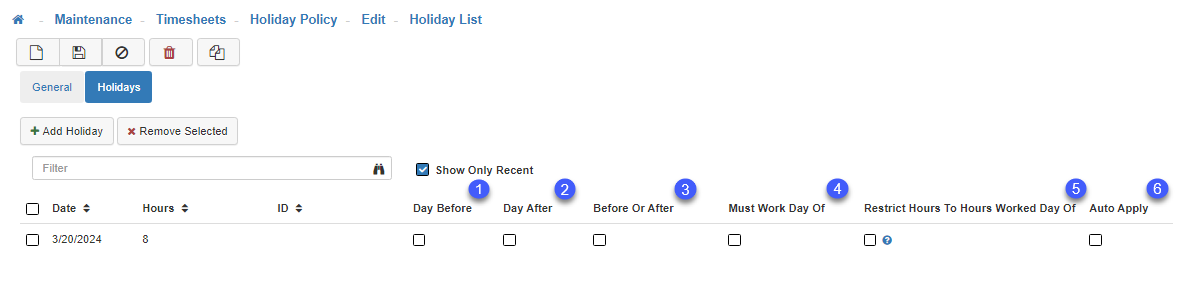
You’ve successfully run the Holiday Pay process, but aren’t seeing the Holiday populate in the Timesheets where you’d expect? The first step is to navigate into the Holiday Policy Maintenance by going to "Maintenance > Timesheets > Holiday Policy". This will allow you to review the Holiday Policies that are set up in your system. Once you’ve selected the policy you’d like to review click the ‘Holidays’ tab. The boxes within each of the columns numbered below, if checked, are the requirements that are enabled that an Employee must accomplish to qualify to receive that Holiday.
Let's say that Christmas falls on a Friday. If your LightWork system is configured so that Employees would need to work the ‘Day Before’ as well as the ‘Day After’ you’d have the checkboxes under columns one and two below checked. Employees who worked Thursday (Christmas Eve) and Saturday (Boxing Day) would be the only ones who would get a Holiday entry added to their Timesheets as part of the Holiday Pay process.
-
How can I assign a set number of hours to Employees every Pay Period without having to go into each Timesheet individually?
This is done using our Auto Pay functionality. Auto Pay requires some setup within the Pay Policy Maintenance before processing. First, navigate to "Maintenance > Timesheets > Pay Policy" and select the corresponding Pay Policy you would like to assign the Auto Pay feature. Once in the Pay Policy Maintenance, click the ‘Auto Pay’ tab. This will bring up all the relevant configuration options associated with Auto Pay. After all the desired selections have been made click ‘Save’ to commit the Auto Pay parameters to the selected Pay Policy.
Once Auto Pay has been configured, you can begin processing Auto Pay by navigating to "Timesheets > Process Auto Pay" then click in the Pay Period look-up to choose the desired Pay Period for processing. Next, make your Pay Policy selection(s) and click Process Auto Pay. The Auto Pay Results will display, once processing has been completed.
Note: If you are using Holiday Pay, please make sure to process it before processing Auto Pay.
-
What is the function of refreshing a Timesheet?
Refresh Timesheet reloads the screen and reverts to the last saved version of the Timesheet. This can be used if you have made modifications in a Timesheet but decide you want to discard these and revert to the last saved version.
-
What is an approval log?
The Approval Log shows information regarding the approval decisions that have affected this Timesheet. Any action that modifies the Timesheet Status (such as approve, unapproved, and rejections) is logged and tracked for future review if needed. If you select the chevron dropdown you can see who modified the Timesheet and when with other pertinent details regarding the change. If ‘No Records Found’ is displayed this means that no related approval actions have taken place on this Timesheet.
-
What does reassigning punches do?
You can Reassign Punches under the Actions drop-down on a Timesheet Detail screen. Reassign Punches triggers LightWork to re-assign punches for this Employee, deleting any existing punch-related records and re-creating them. Why would you want to do this? Let’s say that you have made modifications to a line that was created by an Employee punch and you decide that your modifications need to be discarded you can use the reassigned punches to revert to the original punch-related record.
-
What tools are available under the Actions drop-down?
-
Refresh Timesheet
Reloads the screen and reverts to the view screen. This can be used if you have made any modifications in a Timesheet but decide you want to discard these and revert to the last saved version of the Timesheet. -
Approval Log
This log shows information regarding the approval decisions that have affected this Timesheet. Any action that modifies the Timesheet Status (such as approve, unapproved, and rejections) is logged and tracked for future review. If you select the chevron drop-down you can see who modified the Timesheet and when with other pertinent details regarding the change. -
Calculate Timesheet
Recalculates Timesheet Summary Grid totals. This can also be used when making changes to punches using line tools and triggering an update to the summary totals at the bottom of the screen. -
Reassign Punches
This triggers LightWork to re-assign punches for this Employee, deleting any existing punch-related records and re-creating them (for use-case see question above). -
Delete Timesheet
This will delete an Employee’s Timesheet and revert it to the unopened Timesheet section (see the closed folder button on the Timesheet list).
-
-
What is the purpose of the Line Tools in a Timesheet?
Line tools are tools you can use to make modifications to lines in a Timesheet:
-
Split
Allows you to split the In Time and Out Time of a time entry to create two separate entries. Giving one of the entries created the In Time and the other will have the Out Time. -
Join
Allows you to join two time entries together if they are both missing either an In or Out Time. -
Swap
Allows you to swap the In and Out Time of a single time entry. -
Reset Line
Resets the selected lines In/Out to the original punch details, if tied to a punch from a Timeclock or Kiosk instead of a manual entry. -
Delete
This will delete a time entry line.
Note: You can delete more than one line by checking the boxes next to the left of each line.
-
-
What does "Reset Columns" do?
Reset Columns is used if you make modifications to the columns available on Timesheets in the Pay Policy Maintenance . After you remove or add columns there can be some visual issues that are corrected by resetting the columns. If no changes have been made in this section the reset doesn’t have any visual effect on the screen.
-
What is the purpose of the Reason Code?
Reason Codes can be configured to be used on your site in the Reason Code Maintenance. This Maintenance allows you to create Reason Codes that an Employee or Manager can select when they need to explain why a change to a Timesheet record was made. If you are not using Reason Codes you can remove this column by deselecting it in the Pay Policy Maintenance under the Time Columns tab.
-
Why can’t a User "Approve" their Timesheet?
If encountered, the above message displayed in your LightWork system is informational in nature and not an error. It is signaling to a User that LightWork is unable to complete their desired approval of a Timesheet due to the reason listed under ‘Failure Reason’. There can be some different reasons listed but most commonly it will be ‘Skipped – Already at this Timesheet Status or Beyond’. This reason indicates that the Approval Level the User is assigned in the User Maintenance is below the current ‘Timesheet Status’ listed. When a Timesheet is opened, its default ‘Timesheet Status’ is set to ‘Open’.
To review a User’s configuration relating to the Timesheet Approval process, access the User Security by navigating into "Maintenance > Security > User" and selecting the Applications tab. The two fields that control the effect a User has on a Timesheet are ‘Max Timesheet Status For Others’ and ‘Max Timesheet Status for Self’.
-
Max Timesheet Status for Others
This field controls what the system will change the Timesheet to when a User tries to approve a Timesheet that is not their own. The level selected for this field controls the status when the Timesheet is Approved for others such as Direct Reports or any other Employee Timesheet to the User has been given access. -
Max Timesheet Status for Self
This field controls what the system will change the Timesheet to when a User tries to approve their Timesheet. The level selected for this field controls the status when the Timesheet is Approved for an Employee’s own Timesheet.
Note: The options available for selection in these two fields may differ based on Text Customizations in your LightWork System.
Looking at the Timesheet Status Maintenance ("Maintenance > Timesheets > Timesheet Status") will show you the statuses in your system. If an Employee has a status that has an order that is equal or lower to the Timesheet they are trying to approve the system will display the ‘Skipped – Already at this Timesheet Status or Beyond’ messaging. Consider the Statuses as rungs on a ladder; as the Order gets higher the higher the Approval Level ends with the highest which is ‘HR Approved’. If a User’s access is lower on the ladder than the current Timesheet Status they will be unable to Approve.
-
-
Why am I unable to “Unapprove” a Timesheet?
When attempting to "Unapprove" a Timesheet, there are two main indicators to look at. These are the ‘Timesheet Status’ and the ‘Payroll Status’ and are listed under your toolbar when looking at the detail view of a timesheet. The Timesheet Status determines where the Timesheet is in the approval life cycle and depending on what your User is configured to have as the highest level of approval this controls whether you can modify through approving or rejecting a Timesheet. The Timesheet statuses by default are in ascending order Open, Submit, Approved, HR Approved (Final). Depending on where the Timesheet Status is currently on the ascending ladder of approval and an individual’s User security’ Max Timesheet Status’ settings, different options will be available (or unavailable) accordingly. The other scenario to be aware of is related to the Payroll Status. Once a Timesheet has been pulled into a trial Export it is locked so no further modifications can be made to it, if you need to unapprove a Timesheet that is part of a trial export that trial would need to be canceled before the system allows for a User to unapprove or complete further modifications to the Timesheet in question.
-
How do I process Time Off Requests?
There are two ways to “Process Time Off Requests”.
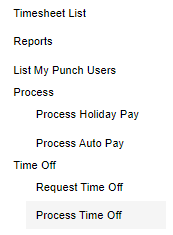
First Method: Get to the “Process Time Off Requests” section using the Navigation Pane.
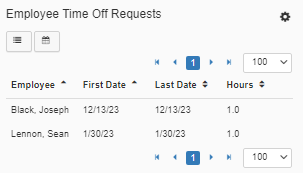
Second Method: Utilize the “Employee Time Off Requests” widget on your Dashboard.
-
Verify the request needing to be processed is showing up in the “Employee Time Off Requests” widget.
-
Click in to process the request.
Either of the methods above will get you to the point of being able to approve or deny time off requests. Once here, find the request that needs to be deleted, click to select it, and hit the “Deny Request” button (Red X) or Approve (Green Check). If rejected, the system will then allow entry of Time Off Request Denial Notes.
-
-
How can I sort by more than one column header simultaneously?
Currently, there are two areas where you can sort by more than one column header simultaneously. The "Employee Time Off Request" widget, and the "Process Time Off Request" screen both allow you to sort by two column headers simultaneously.
Employee Time Off Request Widget: From the Dashboard, navigate to the "Employee Time Of Request" widget.
-
Primary Column: First, click to select the "Employee" column header to sort this column by either ascending, or descending order.
-
Secondary Column: To select the secondary column you would like to sort by, press and hold the 'CTRL' key on your keyboard, and click the second column. Either 'First Date', 'Last Date', or 'Hours'.
Note: Multi-column sorting is limited to a selection of two columns simultaneously, with the Employee column reserved for the Primary selection.
Process Time Off Requests: From the navigation pane, select Time > Time Off > Process Time Off Requests to access the "Process Time Off Request" screen.
-
Primary Column: First, click to select the "Employee" column header to sort this column by either ascending, or descending order.
-
Secondary Column: To select the secondary column you would like to sort by, press and hold the 'CTRL' key on your keyboard, and click the second column. Either 'First Date', 'Last Date', or 'Hours'.
Note: Multi-column sorting is limited to a selection of two columns simultaneously, with the Employee column reserved for the Primary selection.
-