Timesheet Detail
The Timesheet Detail page and details available will vary based on your User Access. Below, you will find all available features in the Timesheet section, though your access will determine what you see. When entering a Timesheet you will either be in your Employee's Timesheet or your own Timesheet.
Timesheet Toolbar
The button tools available in the upper left-hand side of the screen are called the 'Toolbar'. You can hover over these buttons for a tooltip that says what each of the buttons is called, but in the Timesheet, you have the options below.
Note: Access to certain buttons can vary based on your security settings and Pay Policy of the Employee's Timesheet you are in.
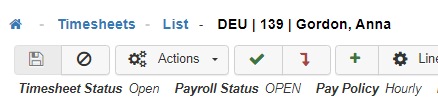
![]()
-
Save
Make sure to save all Timesheets after making any changes. -
Cancel
Erases any changes made to the Timesheet since the previous 'Save' and reverts you back to the Timesheet List screen. -
Actions
Drop-down menu. -
Refresh Timesheet
Reloads the Timesheet and reverts back to the view screen.
Note: This can be used if you have made any modifications in a Timesheet but decided to discard and revert back to the last saved version. -
Approval Log
Tracks the Timesheet’s status change based on Approval decisions (such as Approve, Unapproved, and Rejections). The system will log pertinent details such as:
Note: To view these details, select the chevron drop-down.-
User
-
Employee
-
Source
-
Original Record ID
-
Original Order

-
-
Calculate
When selected, the system will recalculate the Timesheet Summary totals in the grid located at the bottom of the screen. -
Re-Assign Punches
Will re-assign the entire Timesheet to just the 'Hard' punches.
Note: This will remove any manual changes made to the Timesheet. -
Reset Production Export Status
-
Delete Timesheet
This will delete the Employee's Timesheet, revert it to an unopened Timesheet, and take you back to the Timesheet List screen.
Note: You cannot delete a Timesheet with 'Hard' punches. -
Approve/Unapprove
Allows you to Approve/Unapprove the Timesheet. The button alternates as the Timesheet is Approved/Unapproved. -
Reject
Allows you to reject a Timesheet and give the Employee or Manager the opportunity to make changes. Once clicked, a pop-up will appear to write notes for why you are rejecting the Timesheet.
Note: When a Timesheet is rejected it gets sent to the lowest Timesheet Status (this is usually 'Open'). -
Add New Line
Allows you to add a new line to the Timesheet. -
Line Tools
Note: Access to this section can vary based on the time entry mode selected in the General tab of the Pay Policy Maintenance setup.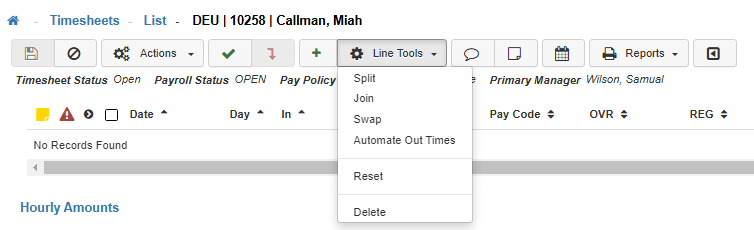
-
Split
Allows you to split the 'In' time and 'Out' time of a time entry to create two separate entries, allowing you to fill in the correct punch association.
Note: If the line being split is associated with a Production Item, any values for Organization Levels from the original line will be carried over to the new line. However, Production Item and Production Task information will not be transferred and must be reapplied if needed. -
Join
Allows you to join two time entries together if they are both missing either an 'In' or 'Out' time. -
Swap
Allows you to swap the 'In' and 'Out' time of a single entry. -
Automate Out Times
Allows you to automate entry of the 'Out' time(s) based on the 'In' time(s) entered on the next line item entry on the Timesheet (as long as that entry is on the same date as the current entry, and the current entry has no Out time).
Note: This feature, ‘Enable Out Time Automation’, needs to be enabled on the 'Time Entry' tab of the Timesheets Module Options Maintenance, and works best when the ‘Auto Increment Date For New Lines’ feature is disabled. You will still need to manually enter the last record of the day, and its lunch times. -
Reset
Resets the selected line's 'In/Out' to the original punch details, if tied to a punch. -
Delete
Allows you to delete the selected line item.
Note: You can delete more than one line item simultaneously by checking the boxes next to the left of each line item. -
Timesheet Notes
Use this section to add a general note for the entire Timesheet. -
Rejection Notes
Gives a history of the rejection notes that were entered during the rejection process. -
Attendance Plans
Gives a snapshot of the Attendance Plan summaries and supporting Absence Transaction(s) for the selected Employee. The Attendance Plans section of the Timesheet now provides an 'Estimated Available' balance based on the Pending and Approved Time Off Requests that have been submitted by the employee but have not yet been exported to your external HRMS system. For more information on the 'Estimated Available' balance details, please see the 'Attendance Plan Details' section of the Plans screen.
Note: This snapshot updates after each import is run.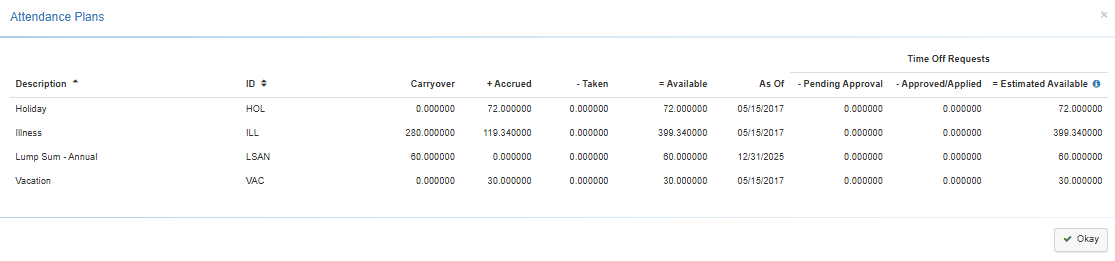
-
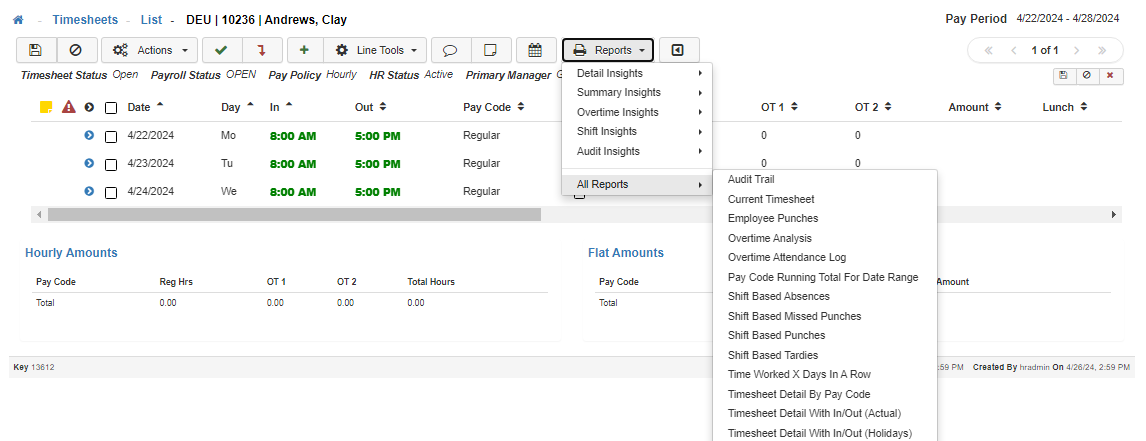
Reports
The 'Reports' drop-down menu provides convenient access to all of the Timesheet reports directly from the Timesheet Detail screen without having to navigate to the Timesheet reports link located in the navigation pane. For more information on the Audit Trail > Audit Insights report please see the Audit Trail Functionality section of the System Options Maintenance.
Note: The Timesheet reports drop-down menu is divided into insight subsections that the specific Timesheet report relates to. When the Timesheet report is run from this drop-down menu it pulls related information for the Employee whose Timesheet you are running it from.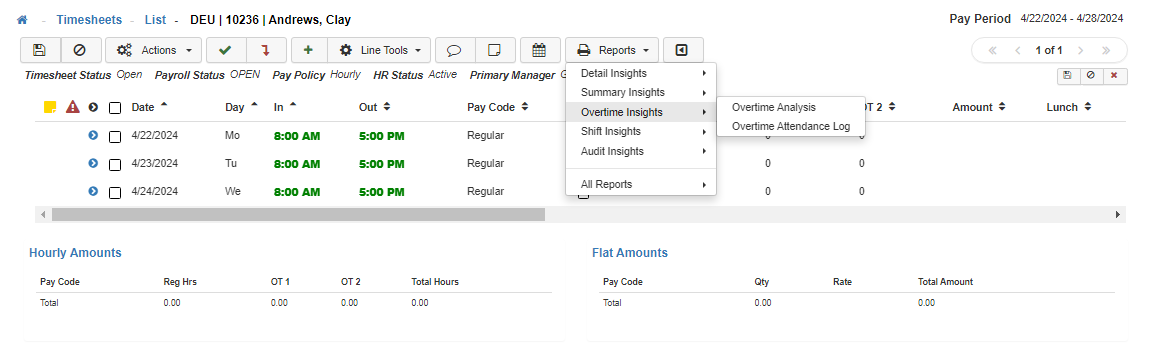
Note: To access the full list of Timesheet reports hover your mouse over the 'All Reports' section of the drop-down menu. Again, Timesheet reports that are run from within the Timesheet detail screen pull information strictly related to the Employee whose Timesheet you are running them from.
-
Print This Timesheet
Generates a printable report for the selected Timesheet.
Note: Click on 'Save' before generating the Timesheet report to make sure any changes that were made have taken effect. -
Show Timesheet Sidebar
When clicked, it will open a sidebar that allows you to jump from Timesheet to Timesheet within the selected Pay Period.
Note: This sidebar uses the Filter that is set on your Timesheet List.

Note: If encountered, the above message displayed in your LightWork system is informational in nature and not an error. It is signaling to a User that LightWork is unable to complete their desired approval of a Timesheet due to the reason listed under ‘Failure Reason’. There can be some different reasons listed but most commonly it will be ‘Skipped – Already at this Timesheet Status or Beyond’. This reason indicates that the Approval Level the User is assigned in the User Maintenance is below the current ‘Timesheet Status’ listed. When a Timesheet is opened, it’s default ‘Timesheet Status’ is set to ‘Open’.
Note: To review a User’s configuration relating to the Timesheet Approval process, access the User Security by navigating into the User Security Maintenance and selecting the Applications tab. The two fields that control the effect a User has on a Timesheet are ‘Max Timesheet Status For Others’ and ‘Max Timesheet Status for Self’.
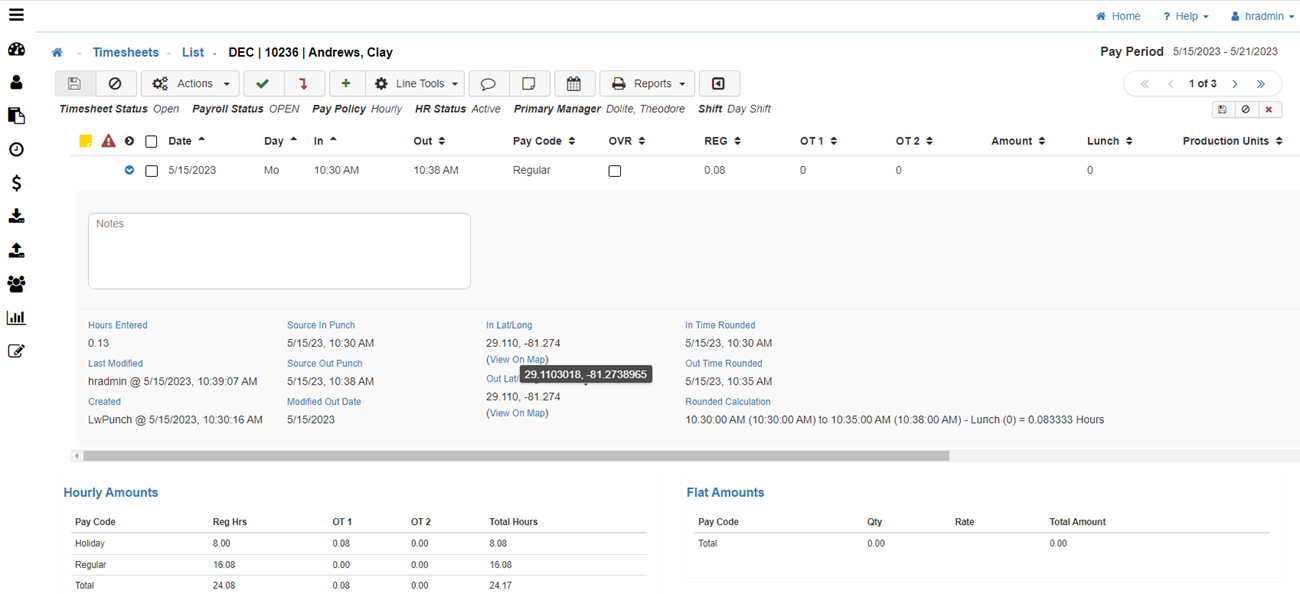
Timesheet Line Item
Note: The picture below is of an Hourly Employee's Timesheet.
-
Date
The date that the hours were worked.
Note: If the 'Out' date is different than the 'In', check the details. -
Day
The day of the week that date falls on. -
In
The 'In' field auto-populates when an Employee punches or can be entered manually. This only shows for detail Timesheets. -
Out
Either auto populates when an Employee punches or may be manually entered. This only shows for detail Timesheets. -
Pay Code
Auto populates with the default Pay Code assigned at the Pay Policy level. -
Hours
The amount of hours worked in totality. This only shows for Summary or Summary Calculated Timesheets. -
OVR
When checked, allows you to edit the REG, OT1 and OT2 calculations.
Note: This is only an editable option for Salary Calculated Timesheets, and is set up in the Time Columns tab within the Pay Policy Maintenance. -
REG
The hours worked that count as 'Regular' time. -
OT 1
The hours worked that count as 'Overtime 1' time. -
OT 2
The hours worked that count as 'Overtime 2' time. -
Amount
If an Employee is paid a 'Flat Amount' for the day, the Amount would display here.
Note: To create a 'Flat Amount' Pay Code navigate to the Pay Code Maintenanance. Flat Amounts utilize Flat Amount Pay Codes to populate the Flat Amount Grid at the bottom of the Timesheet Detail screen. The grid is comprised of the Pay Code, Qty (Quantity), Rate, and Total Amount. The Quantity displayed in this table comes from the Hours column in the timesheet. This number changes according to the totals under the REG column for timesheet lines associated with Flat Amount Pay Codes. The Rate is related to the configuration under the Pay Code Maintenance but can be overridden on a timesheet by selecting the checkbox under the OVR column. The Total Amount for Flat Amounts is Qty multiplied by Rate and totaled for all related timesheet lines. -
Lunch
Shows the automatic lunch that has been taken out for the line entry.
Note: This is setup in the Lunch Options tab of the Pay Policy Maintenance. -
Hours (Rounded)
-
Job
This column automatically assigns based on your external HR/Payroll system setup. -
Organization Levels
These last few columns can vary based on the Organization Levels setup in your system. -
 Detail Button
Gives information specific to the selected line entry. -
Hours Entered
Total hours entered for this line entry. -
Last Modified
Shows the User, Date, and Time of when the line entry was last modified. -
Created
Shows who created the line entry, and when the line entry was created. -
Source Punch Details
Populates when an Employee is a Punch User. Gives the date and time that the hard punch was created. -
Source In Punch
Shows the date and time of the In Punch. -
Source Out Punch
Shows the date and time of the Out Punch. -
Modified Out Date
Populates if the Out Punch falls on a different date than the In Punch. -
In Lat/Long
Populates if Geo Tagging is activated.
Note: Timesheet display of Latitude and Longitude values has been limited to 3 decimal place accuracy for ease of consumption in the line detail view. A tooltip was added to provide the full number when hovering over the value. -
Out Lat/Long
Populates if Geo Tagging is activated.
Note: Timesheet display of Latitude and Longitude values has been limited to 3 decimal place accuracy for ease of consumption in the line detail view. A tooltip was added to provide the full number when hovering over the value. -
In Time Rounded
Displays the rounded time for the In Punch instead of the actual time.
Note: Rounded times will only display if you have the Employee's assigned Pay Policy configured to pay in rounded time instead of the actual time the Employee worked. For configuration of rounded punch times please see the Rounding Configuration tab within the Pay Policy you would like rounding to apply to. -
Out Time Rounded
Displays the rounded time for the Out Punch instead of the actual time.
Note: Rounded times will only display if you have the Employee's assigned Pay Policy configured to pay in rounded time instead of the actual time the Employee worked. For configuration of rounded punch times please see the Rounding Configuration tab within the Pay Policy you would like rounding to apply to. -
Rounded Calculation
Displays the total rounded calculations for the line entry selected.
Note: Rounded times will only display if you have the Employee's assigned Pay Policy configured to pay in rounded time instead of the actual time the Employee worked. For configuration of rounded punch times please see the Rounding Configuration tab within the Pay Policy you would like rounding to apply to. -
Notes
Line notes can be used to provide Approvers with additional details regarding the Timesheet being reviewed. A note can be added to each line entry, and by anyone with access to edit the Timesheet. When a note is added a yellow sticky note will appear next to the line entry to indicate that a note exists.
Note: Hovering over a sticky note will show a preview of the note without needing to click the chevron drop-down.
How to Input Time
-
Basic Usage
To use the manual input you can enter in the time by typing just numbers and the control should automatically add the colon and adjust the position depending on the time you are entering.
If you click just after the colon, at the beginning of the minutes, when you type from there it will replace the minutes as you type otherwise at the end you won’t be able to type more than 4 numbers (XX:XX). -
Reset Value
If you need to reset the value after entering a type, just hit escape.
Note: The date that it is reset to is a snapshot of when the control was entered or clicked into. If the date was changed several times, it will be best to refresh the Timesheet. -
AM/PM Toggle
-
There are several ways to toggle the AM/PM part of the time. You can first click on the AM/PM button next to the input.
-
In addition to clicking, you can either type “+” or “P” for PM and “-“ or “A” for AM.
-
Example: Typing 900 (and hitting the plus key on the numpad) = 9:00 PM.
-