Shift
The Shift Maintenance allows you to configure the Shift(s) available for assignment to Employees within your organization within People Profiles.
Shift Overview
This Maintenance is controlled through the Group Security by the ‘Shifts Maintenance’ securable. If you see the Shift Maintenance available for selection under the Human Resources Maintenance, you have been granted at least some visibility through the Group Security Access for this Maintenance.
-
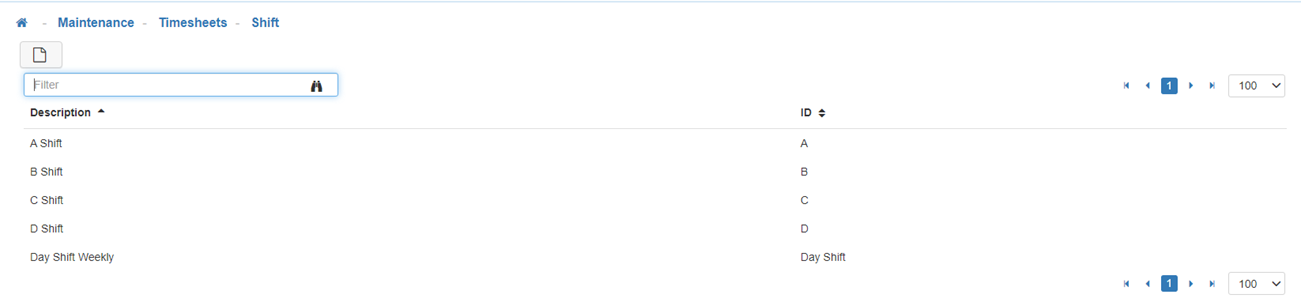
Shift List
Upon navigation into 'Shift Maintenance', you will see a list of all configured Shifts available for selection within the Time Settings card in People. -
New
To create a new 'Shift', click on the 'New' icon. -
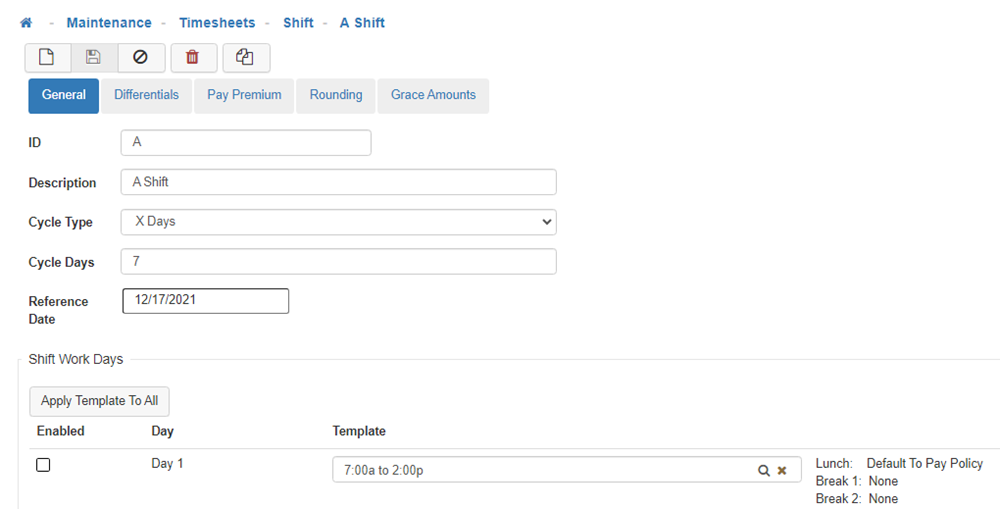
General Tab
-
ID
Fill out the ID for this Shift. -
Description
Fill out the Description for this Shift. -
Cycle Type
Cycle Type refers to what cycle your shifts run on; either weekly, biweekly, or a certain number of days. From the drop-down menu select the Cycle Type, either 'Weekly', 'BiWeekly', or 'X Days'.
Note: Your selection here will determine the number of days displayed in the Shift Work Days section, if you select 'Weekly' 7 days will display, if you select 'BiWeekly' 14 days will display, and if you select 'X Days' the number of days you specify in the 'Cycle Days' field will display. -
Cycle Days
This field is only available when 'X Days' is selected for the Cycle Type and allows you to specify the number of days your shift cycle will run on. -
Reference Date
The Reference Date you select will determine the day of the week the cycle will start on. For example, if the Reference Date you select is a Monday, the Shift Work Days that make up the Cycle Type will also start on a Monday. -
Shift Work Days
There are two ways to set up the Shift Work Days, you can either select 'Apply Template To All' and choose a Shift Template from the lookup menu. This will apply that template to all days that make up the Cycle. You can also select a separate template for each day in the cycle individually by clicking on the magnifying glass located in the Template field for each corresponding day, this method is best used when there are specific days of the week where the hours of operation differ from the rest of the week.
Note: To set up the Shift Time Templates that are available in the lookup menu navigate to the Shift Time Template Maintenance. -
Differentials Tab
-
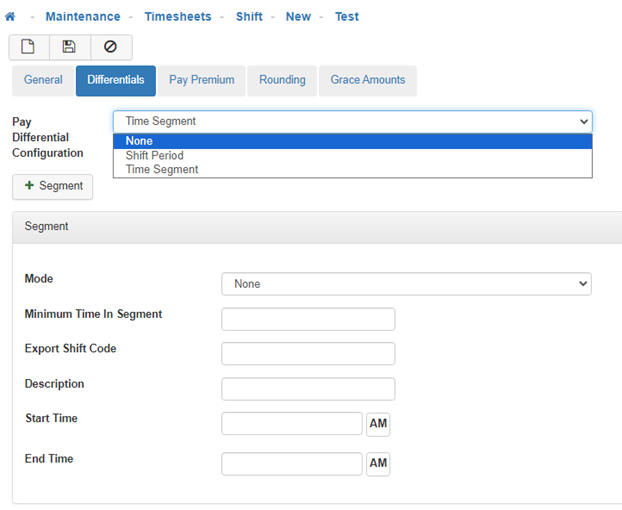
Pay Differential Configuration
Shift differential is a premium pay rate for hours worked at untraditional times, such as nights and weekends. The options available would be 'None' if no Pay Differential will apply, 'Shift Period' which will apply the Pay Differential to the entire Shift, or 'Time Segment' which will only apply to the hours specified in this configuration setting.
Note: If the 'Time Segment' setting is selected, it will require additional configuration, and if at least one Shift Differential Segment is set up ensure that you have the rest of the day covered with at least 2 other segments - one before and one after (mode for each of the other segments set to None) to ensure 24-hour coverage. For example, if LightWork is configured to provide a base rate plus $3 if you work from 3 PM to 9 PM with Time Segment 1 - you will be required to set up 2 other segments to cover from 12 AM to 3 PM and from 9 PM to 12 AM. -
Time Segment Configuration
-
Mode
The Mode will default to 'None', if you would like to add Pay Differential to the Shift, from the drop-down menu select 'Shift Period' if you would like the Pay Differential to apply to all REG, OT1, and OT2 hours worked during the specified time frame, or select 'Override Individually' to apply the Pay Differential to only REG, OT1, or OT2 hours worked during the time segment specified.
Note: If Override Individually is selected, additional configuration will be required for REG, OT1, and OT2. -
Minimum Time In Segment
The minimum amount of time an Employee works during the configured time segment before they qualify for the Pay Differential. -
Export Shift Code
The code used for exporting the Pay Differential to your external HRMS system. -
Description
Enter a Description for the 'Time Segment' Pay Differential. -
Start Time
Enter the time you would like the Time Segment for the Pay Differential to start. -
End Time
Enter the time you would like the Time Segment for the Pay Differential to end. -
Pay Premium Tab
-
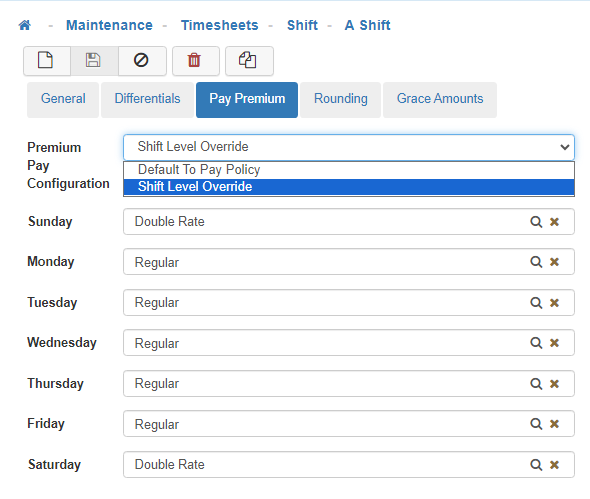
Premium Pay Configuration
From the drop-down menu, select 'Default To Pay Policy' to use the Pay Policy configuration to apply Premium Pay, or 'Shift Level Override' to override the Pay Policy configuration settings and apply Premium Pay based on the Shift configuration settings.
Note: If you select 'Shift Level Override' it will require additional configuration. -
Shift Level Override Configuration
When 'Shift Level Override' is selected for the Premium Pay Configuration, you will need to configure the Premium Pay for each day of the Shift by choosing the Pay Code from the lookup tool. In the example provided above, if an Employee who is assigned this Shift works on Saturday or Sunday they will receive Double Rate pay, and Regular Rate pay when working Monday through Friday.
Note: To set up the Pay Codes that are available in the lookup tool navigate to the Pay Code Maintenance. -
Rounding Tab
These configuration options apply to both manual and punch entries. LightWork utilizes ‘In Time Rounded’ for timesheet calculations. Users can see the rounded value of a time entry by expanding the timesheet detail line item. To override the time used in a calculation, you’d need to select the ‘OVR’ checkbox to complete a manual override for the day. -
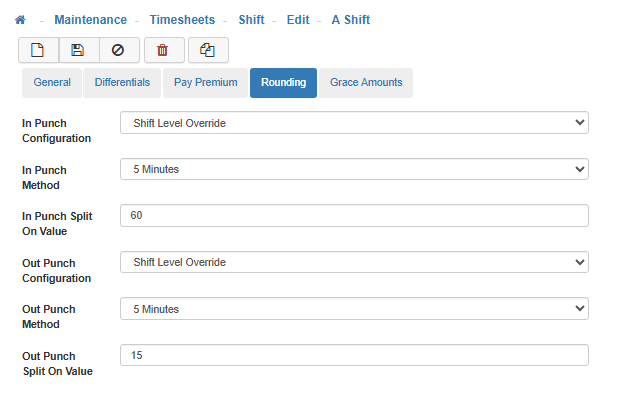
In Punch Configuration
This option applies rounding to a timesheet line based on the ‘Start’ of the associated Shift work period as defined by the applicable Shift Time Template. Select 'Default To Pay Policy' to default rounding to the Pay Policy configuration. When this field’s configuration is set to 'Shift Level Override', the system will analyze to see if the in time is before the applicable ‘Shift Start’. If it is, and is within the ‘Split On Value’ window before said start, then the ‘In Time’ will be rounded to the ‘Shift Start’, overriding the actual time including any applicable rounding for the Pay Policy when also configured.
Note: This does not affect ‘in’ entries after the relevant ‘Shift Start’ time. -
Employee Shift for the day in question defines 8:00 AM as the ‘Start’ time.
-
The ‘In Configuration’ for the Shift Rounding is set to ‘Shift Level Override’.
-
The ‘In Split On Value’ is set to 60 (minutes).
-
Out Punch Configuration
When this field’s configuration is set to 'Shift Level Override', the system will analyze to see if the out time is after the applicable ‘Shift End’. If it is, and is within the ‘Split On Value’ window after said end, then the ‘Out Time’ will be rounded to the ‘Shift End’, overriding the actual time including any applicable rounding for the Pay Policy when also configured.
Note: This does not affect ‘out’ entries before the relevant ‘Shift End’ time. -
Employee Shift for the day in question defines 5:00 PM as the ‘End’ time.
-
The ‘Out Configuration’ for the Shift Rounding is set to ‘Shift Level Override’.
-
The ‘Out Punch Split On Value’ is set to 15 (minutes).
-
Shift Level Override Configuration
-
In/Out Punch Method
This determines how the Punch Time (when the User punches in or out from a Kiosk, Timeclock, or mobile device) rounds. You can round up or down to the nearest 5, 10, 15, or 30 minute increments. -
In/Out Punch Split On Value
This value controls the applicable window before the shift starts. The value here defines the number of minutes to look back from the applicable work day’s shift ‘start’ time when qualifying for applying the rounding. -
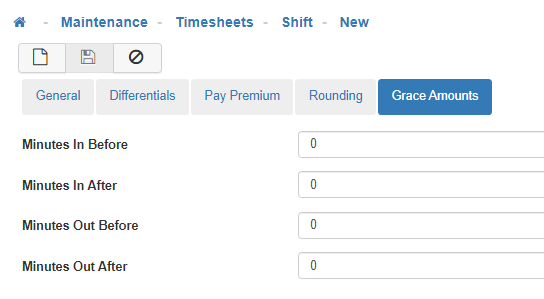
Grace Amounts Tab
Grace Periods for In and Out Punch times are used for reporting and/or tardy identification. -
Minutes In Before
Specifies a number of minutes prior to the shift start time in which if the Employee clocks in they are considered 'On Time'. Clocking in prior to this window would be considered 'Early'. -
Minutes In After
Specifies a number of minutes after the shift start time in which if the Employee clocks in they are considered 'On Time'. Clocking in after this window would be considered 'Late'. -
Minutes Out Before
Specifies a number of minutes prior to the shift end time in which if the Employee clocks out they are considered 'On Time'. Clocking out prior to this window would be considered 'Leaving Early'. -
Minutes Out After
Specifies a number of minutes after the shift end time in which if the Employee clocks out they are considered 'On Time'. Clocking out after this window would be considered 'Working Late'. -
Save
Once you are satisfied with your selections, click on 'Save'. -
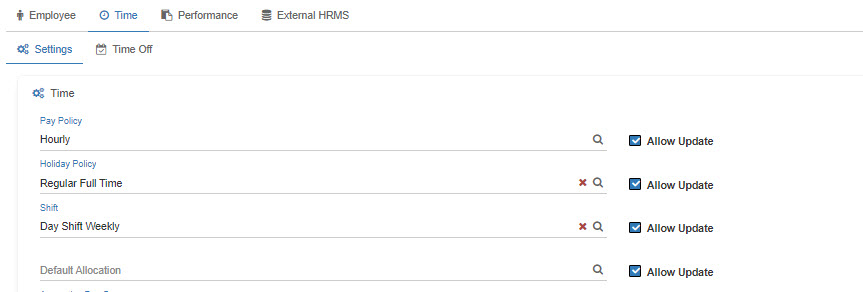
Time Settings
Within People, the Shift field can be found by navigating into the Time tab. From here, if you’ve been granted access to the Time Setting card in Group Security, you can assign or update an assigned Shift.
Note: Once a change has been made the Save button doesn't enable but you do get a Green success pop-up notification.
Example Scenario Configuration:
When would rounding take place?
If our Employee clocks in at 7:32 AM, 28 minutes before the relevant ‘Shift Start’. The rounded 'In Time' is calculated to 8:00 AM, as this is within the configured window of time before the shift start.
When would rounding not take place?
If our Employee clocks in at 6:45 AM, 1 hour and 15 minutes before the relevant ‘Shift Start’. The rounded 'In Time' is 6:45 AM, as this is outside the configured window of time before the shift start that the rounding will apply to (60 minutes, so 7:00 AM – 7:59 AM).
Example Scenario Configuration:
When would rounding take place?
If our Employee clocks out at 5:12 PM, 12 minutes after the relevant ‘Shift End’. The rounded 'Out Time' is calculated to 5:00 PM, as this is within the configured window of time after the Shift End.
When would rounding not take place?
If our Employee clocks out at 5:32 PM, 32 minutes after the relevant ‘Shift End’. The rounded 'Out Time' is 5:32 PM, as this is outside the configured window of time after the Shift End that the rounding will apply to (15 minutes, so 5:01 PM – 5:15 PM).