Process Time Off
Process Time Off is where Users (more specifically Managers) go to approve or deny Time Off Requests for their Employees.
Review & Process Time Off
-
View
Select the 'View' you wish to process the requests in: -
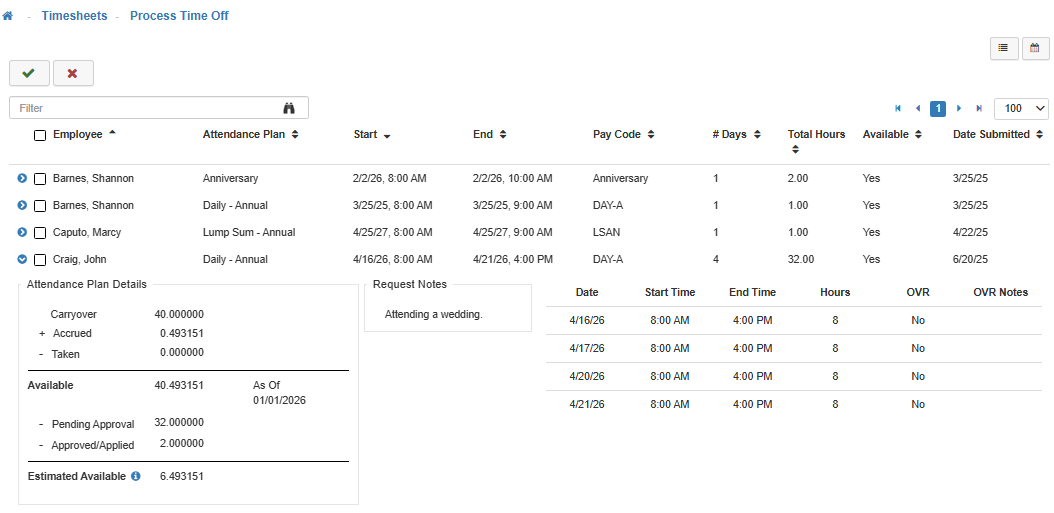
List View
(Image 1) This view lays out all 'Pending' Time Off Requests in a list view. -
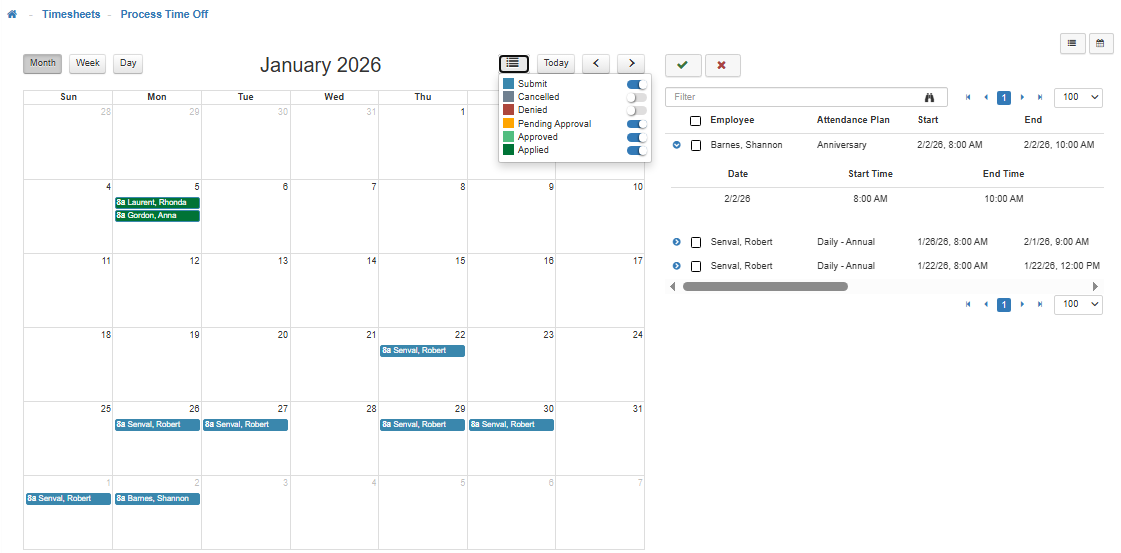
Calendar View
(Image 2) This view lays out all 'Pending' and 'Historic' Time Off Requests on a Monthly, Weekly, or Daily Calendar View. By default, the calendar will display a Monthly View, but you can switch to Weekly and Daily in the upper left-hand corner of the calendar. -
Multi-column Sorting
The 'List View' allows for you to sort by more than one column, in the list of Time Off Requests, simultaniously.Primary Column
The Primary Column should always be the 'Employee' name. First, click the 'Employee' column header to sort the list of Employee names in ascending or descending order.Secondary Column
Next, hold down the 'CTRL' key while clicking on the secondary column header. You can select either 'First Date', 'Last Date', or 'Hours'.
Note: Multi-column sorting is limited to a selection of two columns simultaneously.
-
Review
Review the 'Time Off Request' listed.
Note: In the 'Calendar View', you will have to toggle through the calendar to view all the pending Time Off Requests. -
If a request is highlighted in Red this indicates to the reviewer that based on the amount of available time (since the last import) the Employee doesn’t have enough time to cover requested time off.
Note: A request that doesn’t have available time can still be processed and approved if the system is configured with 'Allow Requests When Time Off Not Available' enabled within the Time Off Request Configuration Maintenance. -
To access the Attendance Plan details, click the Blue arrow next to the checkbox for a detailed break-down of available time.
-
Employee Selection
After review, select the 'Entire List' or 'Specific Employees' by using the check boxes to the left of the Employee's name. -
You can find a specific Time Off Request by utilizing the 'Filter Search Box' to search all pending requests.
-
To mass-approve Time Off Requests select the box next to the 'Employee' column header to mass-select all Employees in the list.
-
Approve/Deny
Once the Time Off Request(s) you wish to approve or deny is selected, use the toolbar to complete the action. -
Approve Request
Note: After a Time Off Request is approved, if changes need to be made to that request Users would need to cancel the original one and create a new request. -
Deny Request
-
Notes
The system will then allow the reviewer to enter notes regarding approval or denial.
Note: When selecting multiple Employees at a time for approval or denial, you will have to add a singular note for all of them. If you need to add an individual note for a request, select that Employee's request separately. -
Applying
After requests have been approved, they will be applied to the Employee’s Timesheet according to how it’s configured (e.g. Auto Apply, if enabled).
Note: Time Off Request History can be accessed under the Employee Profile. This historical information can include Approved, Denied, and Pending Time Off Requests.